During the planning, production and evaluation processes of my coursework, I feel that the technologies I have used have really helped me to develop my knowledge and skills which allowed me to produce work of a higher quality and interaction.
I have used a wide variety of technologies with each section of the course, ranging from video cameras for the production to Facebook and Prezi for the planning. Some of these Web 2.0 technologies were really useful whereas others I feel held me back from what I set out to achieve.
Throughout the whole process I have used the internet blogging site '
blogger.com' to upload all of my work, ideas and audience feedback through the
'creative journey' of creating the video and print productions. This
web 2.0 interactive site has really helped me keep track of ideas and the skills I have learned which I can instantly and quickly refer back too without having to search a hard drive for it
.
It has helped me to organise my work efficiently and show my time-line of ideas, and where they were taking the group up to our final products.

The uploading work was fairly easy, as it was quick to upload
J-Peg images and converted Blogger-format videos into the post, as well as inserting the
HTML (hyper text markup language) codes from
Youtube, which was particularly useful when we were taking
test shots of certain
camera angles, which was easy to insert into Blogger, without having to convert the files ourselves. It was quite hard to remember to keep updating the Blog as we were going about with our research and at our shoots, but with the help of
technological convergence, I was able to download the Blogger app onto my
android phone, allowing me to update my Blog where ever I was. I was able to quickly upload ideas when they came to me in plain text, as uploading pictures from my phone seemed to take a while to do, so I insisted on using the computer for this. Another issue I had when updating my Blog with my android, was the battery. My battery did not like me using Blogger and so it ran out fairly quickly, therefore only being able to write short posts, often posts did not appear on the computer so I had to rewrite them at a later date, which was quite frustrating, as I downloaded the app to save time when I did not have access to a computer.
Prezi

I used
Prezi in the very early planning stages of the music video production process, as we created a presentation of our progressive journey of initial ideas. It is a very
interactive way of presenting work, as you can embed things from other areas of the media and create an interesting twisting presentation. The downside to this program was that it kept crashing whenever we tried to use it and so it slowed down our creativity. When it did go in our favour, we were able to edit the same
Prezi on two computers, using
'edit together.' I sent grace a link from Prezi which allowed us to both edit our journey together at the same time. It was very useful, because we could both work on different areas and verbally talk to each other about what we were doing. It was very useful as we all got to participate and interact with the software, than with just all of us on one computer using one mouse.
Facebook
I made use of the
Web 2.0 and
Social networking site
Facebook which was particularly useful when it came to collecting a
udience feedback for both my print productions and the music video itself. I created a focus group and added the people who I thought fitted into the category of the target audience my group had decided on. By
broadcasting my ideas to a wide varied audience I was able to upload images and links for them all to look at and
feed back to me about what they thought of it. They were able to give me
direct feedback, provided by this Web 2.0 and I was immediately able to change anything they suggested, allowing me to make my
products more audience focused. I also used
Facebook to upload the music video links to my 'timeline,' in aim to get comments and opinions off people who would not necessarily think about listening to this type of music, people outside of our target audience profile. This proved very successful as they picked up on little things which we could not and also they seemed to enjoy the song, so we also opened up their mind to listening to other genres of music. I also used Facebook to keep in touch with all the cast members and the members of my group. Being able to have a joint
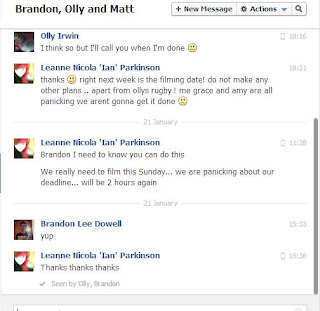
conversation with them all, made it much easier on deciding filming days and ideas for the video, to which we could all agree or disagree with without having to contact each other separately. It was also a quick way of getting a quick response, and of making quick decisions, such as whether or not to go ahead with filming. Since we all had the
Facebook app downloaded onto our phones, we could keep in constant contact, as well as keeping the cast updated in advanced on our plans for the video.
Youtube
Youtube was the main
medium used to hold and convert our test and final videos, to allow us to embed them into the blog. It is really useful for
blogger because it meant you can watch them on the blog, rather than having to transfer to other sites in order to watch it. We uploaded all of our test shots, right from the planning stages to post production, to show how we were learning techniques and how we had used them in our video. We were then able to embed them into blogger using the HTML code, so the audience could view them. The comments element on Youtube was particularly useful when it came to feedback, as I would get an email every time someone commented, which kept me updated with who was watching and their opinions. Many comments were not critical enough for us to make any drastic changes to our final video, but these comments came from the people in my focus group, which showed this Web 2.0 interactive site to be very successful with the opinions of the audience. Since Youtube can hold many different formats of video, we were able to upload videos from different mediums,
such as the computer and Ipad.
Skype

During the project, one of the group members, Grace, went on holiday leaving Amy and I to carry on with the editing of the music video. We decided that we would video call each other whilst in one lesson so that Grace could see the progress we had made. I used my
Kindle and the college
WIFI to get onto
Skype, to call Grace who was in France. We then took a photo as evidence and held the camera to the computer monitor so she could watch what we had done during the lesson, which showed we were being very interactive with the
technology we were using to keep Grace caught up. We were surprised how well she could watch the video on the screen, since the connection was not very strong, but it was a good way for Grace to let us know what she thought, even whilst she was away, showing we were
still participating the whole group in the editing.
Sound-cloud and Myspace
Soundcloud and Myspace was initially used to discover local and unsigned bands which we could of used for our music video. Grace, Amy and I each found an unsigned band on either of these sites and we all listened to them, to then choose the one we felt we could do most with. We decided on
'Late Nite Reading' because even though we did not particularly like the genre of music, we were up for the challenge of creating something to suit a target audience we were not part of.
Time-Toast
I used
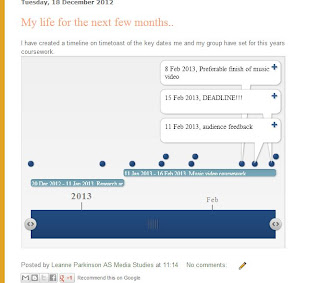
time toast in my planning stage to create a timeline of all the dates and events I planned and expected to happen. This helped my
organisation skills as I was able to manage my time wisely and add in dates and personal deadlines of when I was going to aim to achieve things. I was also able to use it to work out the most sufficient dates for filming and photo shoots in relation to the
coursework deadlines and the provisional editing deadlines I put in place for personal preference. It was quick and easy to refer back too to determine whether or not I was on track, however with the disruption of snow, towards the end was a little bit of a struggle and we seemed to go past the initial video finishing date as we had crucial days off college. The only problem was, I had to log back into time toast in order to add any other new dates I came up with, which was very time consuming, so I started to update using blogger instead. This however showed our journey and how our ideas and dates changed, showing how we developed our ideas and our video as a whole.
Music Technology
Kindle

As mentioned before, we used my K
indle Fire HD to Skype Grace whilst she was on holiday. I also used my
Kindle to download our chosen song off Youtube through an app called
'Youtube free' so we could listen to the song anywhere without having to use the internet. It gave us a new
media platform which we could play it out of and helped us a lot in the planning stages when we were coming up with ideas, I could just pull out my kindle and bring it up, without the hassle of booting up a computer which is very time consuming when all you want to do is use a Youtube song. We then used this
mp3 as our foundations at our performance filming day. We had trouble with this as the speakers were not very loud and could not be heard over the boys playing the guitars and the drums.
I-phone and car converter

When we discovered the Kindle was not loud enough to hear the music over the boys, we moved to another idea of plugging an
I-phone into Grace's car speakers, and blasting the music in the surrounding area. It was much more convenient for us, because it allowed the cast to feel the music more than when it was being played out from the kindle, and get into the acting role of the desired band. It also allowed them to feel the beat, and play along to it, still able to hear the mp3 loud and clear, because of course we took away the audio in the editing.
I-Pad
Me and my group used Amy's
I-Pad as a second video camera, recording scenes and evidence of us recording our music video. We initially wanted to capture the atmosphere in which we were filming and what we got up too,
as well as all the arrangements of the camera, cast position and lighting. An app was downloaded to enable us to merge all the clips together to form a short video of the making of our video. This was then uploaded to
Youtube to which we could embed into our blog and watch from other media platforms.
Software
Adobe Photoshop

I used
Adobe Photoshop CS5 in my print productions for creating my digipak and advert. I already had a little bit of background knowledge from AS, such as
vibrancy and saturation but I learnt the majority of my new skills whilst in the production stage of these tasks which helped me to develop and create a more professional looking print, suitable for my target audience. The removal of backgrounds and cutting out a figure was the most common technique I used on this particular program. It took time to cut round the edge, using different tools such as the
magic wand, and
quick selection tool to cut a smooth edge round the models to give a more
professional and neater look. I was then able to use the layering on the right hand side, to position each individual image on the page to build up my design,. This
layering proved very successful with the title of the band and album name 'Perfection' which I used three types of different colours, Red, White and Black and layered them so little bits of each colour was showing, creating something which looked more
3D and appealing to my audience. I used this style on both my advert and digipak to show coherent ancillary products which would help with audience recognition.With experimentation and testing, I was able to discover new techniques and approaches I could use to edit my photos to create my print work. An example would be using the artist format to transform half of Matt's head into a
'cut out' format, which used block colours of the different tones. It was very subtle over the original image but looked really effective.
Adobe Premiere Pro
 |
| Razor tool icon that i used |

We used
Adobe Premiere Pro to edit our music video, which was a program we were introduced to at the end of our AS year, so we knew all the basic things, which we were reminded of when we began to edit. Our style of video meant that we had to use lots of
shot and quirky clips, in order for it to fit to the beat and to feel the pace though the editing. We started by using what we thought were short clips, but found that actually they were really long in comparison to the beat of the music. Therefore we were introduced to a tool called the
'Razor tool' which split up our clips into sections as long or as short as we wanted. We could then move these shorter clips around within themselves to create quirky clips which fitted to the beat in a style that suited us. We began using this much more with lots of our clips and it seemed to be very successful and pleased our audience. These quirky clips we quickly
exported using the exporting bar and uploaded to Youtube so we could use technological convergence to blog what we had learnt, so we could quickly refer back to them with the details of how we achieved it, which really helped in our planning and evaluation as we knew exactly what we had done and how we did it, with the final results of what we achieved as a short video. We also learnt how to change the
opacity of clips so we could fade them in and out of each other, such as the
fade out of the window clip at the end to show it was the end of the video.
The effects control panel allowed us to choose some effects which were needed in order to boost up some of the lighting in the video which we were unhappy with. We used the
brightness and contrast to alter some of the lighting of clips which looked a bit dark and dingy, using this. It also held many more effects which we did not use. Premiere was also very useful with
speeding up, slowing down and reversing shots, such as the reverse shot of the boys getting into the car, and the slow motion of Matt and Lily walking down the path.


We just had to right click on the chosen clip, press
speed/duration and we were able to alter the speed of the clip in %'s and reverse the clip if it was needed. This added much more intensity and pace to the video than if we kept some of the clips normal speed, such as the car. When it was sped up, it looked much more exciting and enjoyable to watch, which added to the pace and beat of the music.
Premiere allowed us to make more accurate short cuts, with the 'viewing' feature, making the seconds/milliseconds of the timeline shorter so we could be very precise in the time of cutting clips. This was very important when it came to the
lip-syncing as we wanted it to be spot on and in time to the lyrics of the song which is something I feel we did well.
I also used premiere pro when I did test shoots for the video. We experimented with green screen by filming something in front of a green back-drop, and then removing this green using a tool on the programme. This was then easy to insert an image or video behind the image we had originally filmed. This process was very tedious and was quite hard o get right, but it was a useful technique to learn in case we did decide to use this in our video.
Microsoft Word

I used
Microsoft word for draft versions of my written work, which I later transferred into my blog. It was just quick and easy to type things down and then copy and paste into the writing space on blogger. I also used it to create tables for my risk assessments which was not possible in other programs, which gave me a proportional table in which I could list all the hazards and how to prevent them, then simply copy it into blogger and the table would be copied for me.
Equipment
DSLR (Digital Single Lens Reflex) Camera
To take the photos for my print productions, I used my own
Nikon DSLR camera, with two various
lenses to ensure I had long, mid and close up shots, allowing me to take more professional and better quality photographs than if I had used a digital or mobile camera. We presented the models on a plain background in a large space so we were able to
edit out the background as we wished, using the
magic wand and quick selection tools. Since my dad is a photographer, I had a very good understanding of how cameras worked, so I was not new to any of the equipment I was using. I made the models pose and act as naturally as possible as they already were in a band, but some of the stunts were staged such as the jumps, which took a few times to capture correctly. I experimented with the lighting a lot, and tried taking pictures
with and without flash to see which areas of the pictures were highlighted and if it made it clearer and/or better. It was shown that the flash did help the quality of the pictures and so the images I used in my digipak were taken using flash as it
highlighted the models and the pictures were generally clearer which made them look more professional.
I also used a Nikon DSLR D60 camera for the testing of Stop motion animation. We took a variety of still images of a stimuli, moving it very slightly after every shot. We then put all of the images together to create a flowing picture. It was very difficult to keep the lighting consistent throughout the process, and to make sure you only move the stimulus a tiny amount each time. It was a key thing to learn in case we decided to use it. However since our genre was fast paced and rock-pop, we felt that the stop motion would not be convenient to use as it was not a typical convention, and would not fit.
Video Camera
Our raw footage for our music video was taken using a
Panasonic video camera, which I owned. It was
fully HD (high definition), so therefore we could get a really good image and picture on the computer, when we had the lighting right. The good thing about the camera was my own, was we did not have to wait or go through the trouble of booking out cameras from college and only being able to borrow it for a short amount of time. We did have some concerns about the footage being able to work on the college computers, which is why we decided to start filming early so if we did have this trouble, we would be able to go back with the college camera and re-film. The camera was fairly straight forward to use, and I was taught the basics before we started filming, we just had to be conscious of the battery life and ensured we had filmed everything we needed too. The
zoom on the top of the camera was very easy to use, however it only had to be moved with the slightest touch to get a good zooming in. a more forceful touch made it zoom in fairly quickly which is something we tried to avoid. We used a mixture of handheld shots and ones from a tripod to give different feels in the video, to again add to the pace and bounciness of the music. The footage was recorded onto an
SD card, but the
charging dock was able to connect to the computer through an USB, so I was able to transfer the footage straight from the camera without the hassle of removing the SD card, which was very efficient and easy to do.
I used both the
DSLR camera and video camera to show the
star image (Goodwins analytical framework) through the use of close up and extreme close ups, which was one convention we found typical of music videos, and allows the audience to connect more with the band.
Lighting
We used
photography lights when filming to boost the highlights of the models and make them seem brighter in the footage, creating a more sophisticated look to the video. There were situations where the lights did not make much of a difference, or times when we did not need them, such as when we were filming in the park, the natural light of the sun acted as a main light and fake lights just were not needed.
Computers
The one piece of equipment which was not particularly efficient in the production of the music video was our college computers. The size of the video clips and our hard drive space were very limited, so therefore we were restricted to one computer where we put all our clips onto the E drive, which was accessible only on that computer. Furthermore, Premiere Pro took ages to open and load the document of the video every time we went into the lesson to edit, so we spent that time whilst it was opening to update our blog and to discuss what we were going to do that lesson.
Windows Movie Maker
During the panning stages, I used
Windows Movie Maker to create a
digital animatic storyboard of certain shots and the narrative idea which we hoped to use. I drew images on paper first, and then scanned them into the computer using the colleges scanner. They were then imported into Movie Maker along with the songs mp3, which was cut down to 15 seconds. I then used these images to create a storyboard which responded to the music we had chosen. This became particularly useful during production, because we could refer back to it to determine our basic outline for the video.
We also used Movie Maker to create a mash up of all the videos we got inspiration from and took those elements to create the first 15 minutes of aspects which we wanted our video to look like. These eleements included Justin Bieber, Fall out Boy and other artists which we fitted together so we had a concept to work with and how we initially wanted our video to look like. This showed our use of
Bricolage as we took elements from different walks of genre and videos to create something which was unique and our own which we would work with for our own video.
Technological Determinism + Media 2.0
It is seen as
technology is the agent of social change. It moulds society and changes our behaviours and interactions. It is often seen as the present being projected into the future so we have no option but to adopt the technology. I do think it is still visible in today's society, and its what we looked at online in our initial research that helped drive our ideas of our own video. We looked at a lot of inspiration online, from different areas of
music genre, such as Justin Bieber, Green day and Blink 182, all from different genres of music. We decided to use little areas of each in our own music video, which could suggest our own music video is
post-modern using Bricolage, and the patchwork of each genre of music to create our own video. As Tim O'Reilly suggests,
'harnessing collective intelligence' , web 2.0 is preliminary collaborating with other styles and projects than trying to create your own material. Through our research, we used several media platforms to look at current artists and ideas which they used in their music videos and picked out key elements which we found interesting, such as the hand held effect of Justin Bieber in his video of 'Beauty and the Beat.' We then decided to manipulate the areas we liked and use them in our own way in our music video, such as using this hand held effect right at the start of the video where the artist says 'Hey guys.'
Critics of
media 2.0 seem happy to discard the rise of creativity online, perhaps because they prefer the older methods of communication. They repulse the ideas of some
conventional research methods being replaced with new methods which make use of peoples creativity- and that the audience are becoming more of the producer in music terms. The use of
sound-cloud can give the opportunity to young artists to upload their music to the internet in hope to get known and recognized we are driving towards a more audience driven society, where we do more and are starting to determine what happens in our culture when it comes to music. Music labels are beginning to change to a pull media society, where they reach out to the audience to hear their views and act upon them instead of them pushing their media products to the audience to consume.


